
home for-sale how-we-build crokinole crokinole-gallery about-us
Next pageI make two decks and two bases from one 4'x4' sheet of 1/2" plywood.
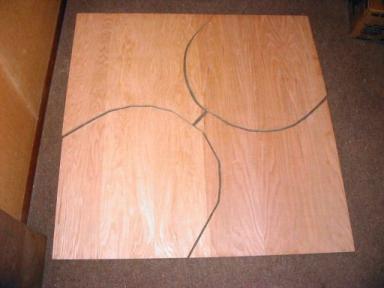 First, I mark off two 26" diameter circles in opposite corners of the square.
I try to position each circle so that it is no more than 1/8" from the board edge.
I then roughly cut around the circles, staying about 1/2" from the line.
I am careful not to get too extravagant with the cuts because I need the remaining
wood to make the bases. The round-shaped pieces will become decks, and the
arrow-shaped pieces will become bases. I cut two 4’x4’ squares for four boards.
(I gave one set to Carl so he could make a special board.)
First, I mark off two 26" diameter circles in opposite corners of the square.
I try to position each circle so that it is no more than 1/8" from the board edge.
I then roughly cut around the circles, staying about 1/2" from the line.
I am careful not to get too extravagant with the cuts because I need the remaining
wood to make the bases. The round-shaped pieces will become decks, and the
arrow-shaped pieces will become bases. I cut two 4’x4’ squares for four boards.
(I gave one set to Carl so he could make a special board.)
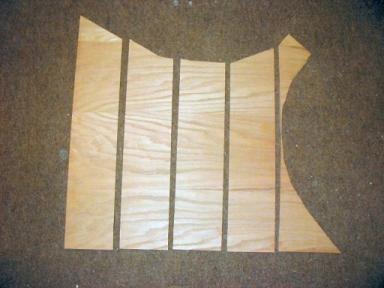 I cut each arrow-shaped piece into four panels of equal width.
Each piece is symmetric, so it does not matter in which direction I cut.
The piece must enclose a square of at least 21", and I should get at least
21.5". Each panel should be at least 5.25" wide, the wider the better.
I cut each arrow-shaped piece into four panels of equal width.
Each piece is symmetric, so it does not matter in which direction I cut.
The piece must enclose a square of at least 21", and I should get at least
21.5". Each panel should be at least 5.25" wide, the wider the better.
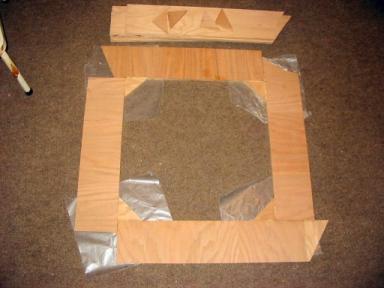 I arrange four panels in a pinwheel fashion so that each one overlaps the next.
There are some critical measurements to be made here.
The outside edge of each panel must be at least 30" from the outside edge
of the opposite board, so the pattern forms a 30" square. It is also
important that the outside corners are 30" apart along the diagonals, wood to
wood. Ideally, I want these distances to be 30.25", which gives me some
cutting room. I slide the boards until I get the right measurements, and I mark
them with a pencil so that later I can quickly position them.
It is a good idea to use a square on the insides to ensure 90 degree angles.
I arrange four panels in a pinwheel fashion so that each one overlaps the next.
There are some critical measurements to be made here.
The outside edge of each panel must be at least 30" from the outside edge
of the opposite board, so the pattern forms a 30" square. It is also
important that the outside corners are 30" apart along the diagonals, wood to
wood. Ideally, I want these distances to be 30.25", which gives me some
cutting room. I slide the boards until I get the right measurements, and I mark
them with a pencil so that later I can quickly position them.
It is a good idea to use a square on the insides to ensure 90 degree angles.
If I were to place a deck on top of the base now, there would be gaps at the inside corners. I fill the gaps by gluing a triangular wedge in each inside corner. I cut four wedges from my scrap plywood. The wedges must be at least 1.5" long to cover the gaps, but I usually try to get 3" for more surface contact.
 I put wax paper under each joint because it protects my table or rug from
squeezed out glue. Wax paper does not stick to glue very well,
and I can easily sand off any that does.
I put wax paper under each joint because it protects my table or rug from
squeezed out glue. Wax paper does not stick to glue very well,
and I can easily sand off any that does.
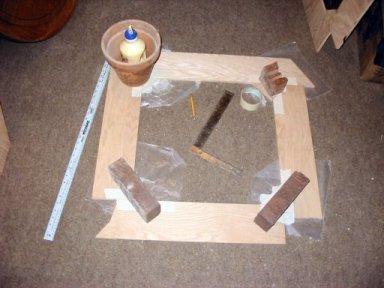
I tape the joints along the edges on both sides before I glue. This protects the wood from any squeezed-out glue. I put wood glue along the contact points and push them back together using my pencil marks as guides. I check the squareness and the lengths. I then put some weights on the joints to keep the tops of the panels flush to each other. I let this setup dry overnight.
You may be surprised that I do not clamp the panels together. There are no good spots to put clamps, and clamps tend to bend the base. Also, I really do not need the clamping pressure. When I glue the deck onto the base, the deck will hold the piece together because the contact area is rather large. I only require that the panels hold together until I glue down the deck.